
Bluegrass Banjo Set-Up for
Beginners
by Ben Freed
Give me a banjo with loose bracket hooks
and rusty strings, I can practically hear its desperate cry for help. I am
compelled, as if by a banjo playerÂ’s Hippocratic oath, to come to its aid.
(First, do no harm!) For me, the prospect of healing a maladjusted five string
is an irresistible challenge. And with a few easy steps, you too can save a poor
suffering wretch from eternal wandering in Banjo Purgatory. And so, with that objective, here are the basics of bluegrass banjo set-up that all pickers,
including beginners, should employ to keep their instruments in good health. By
the way, even if your banjo is new, right from the store or factory, it might
not be in optimal adjustment. A little tweaking could make a big difference.
Three fundamental objectives of any
bluegrass banjo set-up are 1. good “action”- the desired height of the
strings above the fingerboard, 2. good tone and volume and 3. proper
intonation-the banjo should sound in tune when fretted. The following basic
steps should achieve those objectives in many, if not most instances.
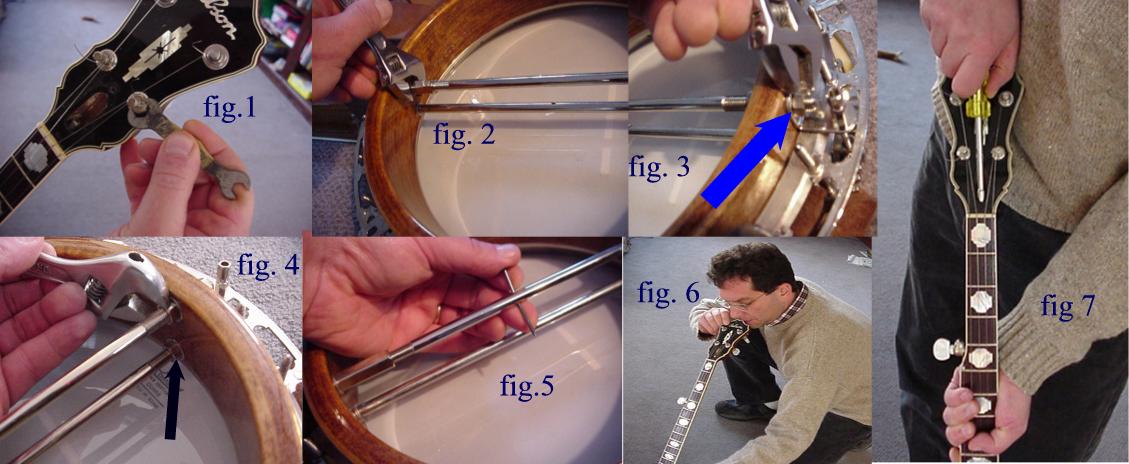
- tuners snug? Easy enough, right? (fig.1, below)
- head tight enough? The age-old question: how
tight is tight enough? The simple answer is that a banjo head needs to be pretty
tight. Not scientific enough for you? Well, how about this: It
shouldnÂ’t be too loose. A head that is not quite tight enough will
cause the banjo to be muddy sounding
and harder to keep in tune. If the head on your banjo hasnÂ’t been adjusted
in a few years, then it will definitely be too loose, and the tone and
volume will diminish. Tighten the bracket hex nuts about a quarter of a turn
at a time. And stagger the nut tightening from one side of the banjo to the
other, so the head gets tightened evenly all around the clock-dial. For
example, tighten one bracket at 3:00 oÂ’clock, then the one at 9:00, then
at 6:00, then 12:00, etc. If
head tightness could be rated on a scale of one to ten, with one being just
tighter than flapping around in the wind, and eleven is when it rips or
splits, then suffice it to say that some players like it as “loose” as
seven or eight, which will give the banjo more of a plunky, “tubby”
tone, while other players like it turned up to nine or ten, when it is more
piercing and stiff sounding. Generally, the head of a banjo needs a little
tweeking a few times a year(just like some human heads I know), particularly
if it is exposed to a lot of humidity. YouÂ’ll know if it is too tight and
ready to pop because the bracket nuts will be hard to turn. YouÂ’ll know if
it is too loose if you can easily push in on the head with some finger
pressure, and the pitch changes noticeably.
- neck tight to the rim? This adjustment is
critical for the sound and playability of all banjos. I canÂ’t overstate
the importance of this aspect of set-up. A loose connection between the neck
and rim will absorb vibrations and diminish tone. A tight-as-possible
connection will allow the neck and pot to act as a single unit thus yielding
more volume and responsiveness. Many
a cheap banjo can be much improved with this maneuver. The neck is
tightened to the pot by tightening the long coordinating-rod nut, if present(fig. 2) or by
turning the coordinating rods clockwise. To do this, first loosen the
coordinating rod nuts(fig. 3 and 4) Then insert a strong finishing nail or
similar strong, narrow rod into the coordinating rod hole(fig. 5), and turn
the rod clockwise until very tight. Be sure there are washers on the
rods at the rim, otherwise the rod will dig into the rim. Finally, tighten
the nuts back against the rim(again, figure 3&4). When doing so, do not create undue lateral
stress on the rim. In other words, the walls of the rim should not be forced
away from parallelness by the rods pushing or pulling on them. (DonÂ’t
forget to take the nail out!)
- Strings. If your strings are rusty, you could
either get yourself a tetanus shot, or just try buying a new set and
replacing them every few hours of use.
- bridge placement correct? The distance from the
nut to the 12th fret should be equal to the distance from the 12th
fret to the bridge. If the bridge is in the correct location, the harmonic
note generated at the 12th fret, or the midpoint of the string,
will be the same pitch as when the string is fretted and plucked at the 12th
fret.(To create a harmonic, lightly touch the string at its midpoint with
the fleshy part of a left hand finger, without pressing it all the
way to the fretboard, and at the same time, pluck the string. The “chime” you hear is the harmonic.) If the
fretted note is higher (or
lower) than the harmonic, then move the bridge towards(or away from) the
tailpiece by a few millimeters. Check the location of the bridge every time
you change strings.
- truss rod adjustment: Adjusting the truss rod
in the neck can often straighten out a neck that has a bit of a forward or
back bow. If your adjustment doesn’t help the problem, then take it to a
pro, but donÂ’t be afraid to do this yourself, because banjo necks need to
be adjusted this way fairly frequently, perhaps once or twice a year. Changes in
humidity and temperature are usually the reasons. To see if the neck is
straight or bowed, sight down the neck
from the nut to the bridge (with the strings tuned up to pitch), sort of like sighting down the barrel of a
gun(fig.6). If you practice on every fretted instrument you get your hands
on, you will get good at seeing whether the neck is straight or bowed. If
you detect a concavity to the neck, take off the truss rod cover(duh!) and,
with the strings on, use a nut-driver (fig. 7) to turn the truss rod
clockwise. Conversely, if you detect that the neck has a forward bow, you
can loosen the truss rod by turning it counterclockwise. I have rarely had
to turn the nut driver more than a single turn to relieve the bowing.
(Usually less than a single turn is all that is needed.) A point worth
mentioning is that some pickers prefer a very, very slight concavity of the
neck in order to reduce a slight buzz, if detected.
- bridge height: If you have tightened the head,
put the bridge in the correct location, and the neck is straight and
attached nice and tight, you
can now see if the action is to your liking. New players like low action;
more experienced players like higher action. Most Mastertone-style banjos
will do well with a 5/8 inch or 11/16”
bridge. Other heights include ½”, and 3/4”.
Now what? If
your banjo is still sounding sickly, take it to a real banjo doctor, preferably
one that is (finger)board certified.
Back
to home page for learning Bluegrass Banjo
Here's a neat article on installing
fifth string spikes: http://members.tripod.com/banjoist/spike2.html
Ben's
Personal Tab Collection::One Hundred Essential Bluegrass Banjo Solos
